A leaking roof can quickly turn into a big problem if you ignore it. When water starts dripping during rain and you can’t fix it from the outside right away, knowing how to fix a leaking roof from the inside becomes a real lifesaver. This guide will show you step by step how to locate, seal, and patch a roof leak safely from inside your attic or ceiling space. You’ll also learn when a quick fix will do, and when to call a professional like FONZ Construction for long-term repairs.
Understanding What Causes Roof Leaks Inside the House
Every homeowner faces roof leaks at some point. It can start small maybe a few drops after heavy rain but that’s how most serious problems begin.
Leaks often come from cracked shingles, damaged flashing, or gaps around roof vents and chimneys. Sometimes, it’s just wear and tear over time. Moisture can find its way through even the smallest holes and start dripping down your ceiling or into your attic.
Knowing what causes these leaks helps you spot issues early. If your roof has missing shingles, clogged gutters, or flashing that’s pulled loose, water can easily sneak inside. Also, poor attic ventilation can trap humidity and lead to moisture buildup, which weakens wood and insulation from the inside out.
Signs You Have a Roof Leak Inside Your Home
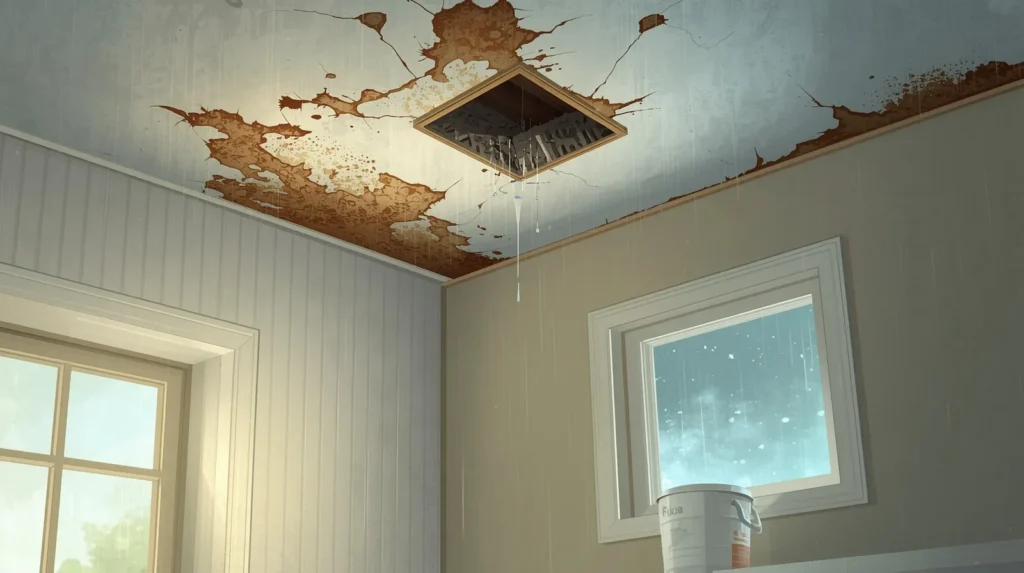
You don’t need to climb onto the roof to notice something’s wrong. There are several warning signs inside your home that point to a roof leak:
- Water stains on ceilings or walls.
- Dripping sounds during or after rainfall.
- Peeling paint or bubbling on your ceiling.
- Wet insulation in the attic.
- Musty smell that suggests trapped moisture.
If you see any of these, don’t wait for it to get worse. Even a small leak can spread fast, especially when trapped inside the attic. Once the insulation gets wet, it loses its effectiveness and can even cause mold.
How to Find a Roof Leak from the Inside
Finding the exact source of a leak is the hardest part. Start by going into your attic during the day. Bring a flashlight, because you’ll need both light and darkness to spot it properly.
Here’s how:
- Look for dark stains or damp spots on the wood or insulation.
- Trace the path of the water upward, since water usually travels before it drips down.
- Turn off the lights and check for any sunlight peeking through holes in the roof boards.
- During rain, listen closely the sound of dripping often helps pinpoint the leak’s location.
If you see moisture, mark it. Sometimes leaks start around vents or where two roof planes meet. This will help you plan your roof repair from inside the attic.
Safety First Before Attempting Any Roof Repair from Inside the Attic
Before you get to work, make sure you’re safe. Roofing work can be tricky, even when done from the inside.
Here’s what you should do:
- Turn off electricity near the leaking area to avoid shocks.
- Lay down a tarp or plastic sheet to catch dripping water.
- Wear gloves, goggles, and a mask to avoid dust and insulation fibers.
- Use a sturdy ladder and make sure someone knows you’re up there.
Safety isn’t optional. Even simple DIY roof repair leaks can turn dangerous if you rush it. Take your time and stay cautious.
Temporary Fix for Leaking Roof Inside During Rain

If the rain is pouring and water is coming in, don’t panic. You can apply a temporary fix for a leaking roof inside until the weather clears.
Here’s what to do:
- Place a bucket under the leak to collect dripping water.
- Use a screwdriver to poke a small hole where water is bulging in the ceiling. This drains it and prevents the ceiling from collapsing.
- Cover the leak from the inside using a tarp, plastic sheeting, or roofing tape.
- Apply roofing tar to the affected area if you can reach it safely.
These emergency fixes work well when you can’t get outside. Just remember, they’re not permanent. Once the weather clears, you’ll need to patch the roof leak from inside properly or contact professionals for a complete repair.
Step-by-Step Guide on How to Fix a Leaking Roof from the Inside
Now let’s go over exactly how to fix a leaking roof from the inside in a safe and lasting way.
Step 1: Find the Leak Source
Go into your attic and trace where the water is entering. Look for dark spots, mold, or dripping. Mark the area clearly.
Step 2: Dry the Area
Before applying any material, dry the surface completely. A wet surface will prevent adhesives and sealants from sticking.
Step 3: Apply Roofing Tar
Use a putty knife to spread roofing tar over the leak. Press it firmly into the crack or hole. Roofing tar is thick, so apply evenly for complete coverage.
Step 4: Patch the Leak
Place a piece of plywood or shingle over the tarred area. Press down to seal it tight. This creates a solid temporary fix.
Step 5: Seal It Again
Add another layer of roofing tar over the patch. Make sure it covers the edges fully to prevent future leaks.
Step 6: Monitor After Rain
Check your work after the next rainfall. If you still see drips, the water might be entering from another point.
This method is reliable for small leaks, holes, or vent cracks. For large-scale problems, it’s better to call experts like FONZ Construction for complete inspection and long-term repair.
DIY Roof Repair Leak Techniques Using Common Materials
You don’t always need fancy tools to patch your roof leak from the inside. Most homeowners can manage basic repairs with items found at any hardware store:
- Roofing tar or mastic
- Plywood patches
- Roofing tape or duct tape
- Utility knife
- Putty knife
- Flashlight
For small holes, apply roofing cement and press a shingle or metal sheet over it. For larger leaks, use roofing tape as a roof temporary patch until a roofer can fix it.
How to Seal a Leaky Roof and Prevent Further Damage
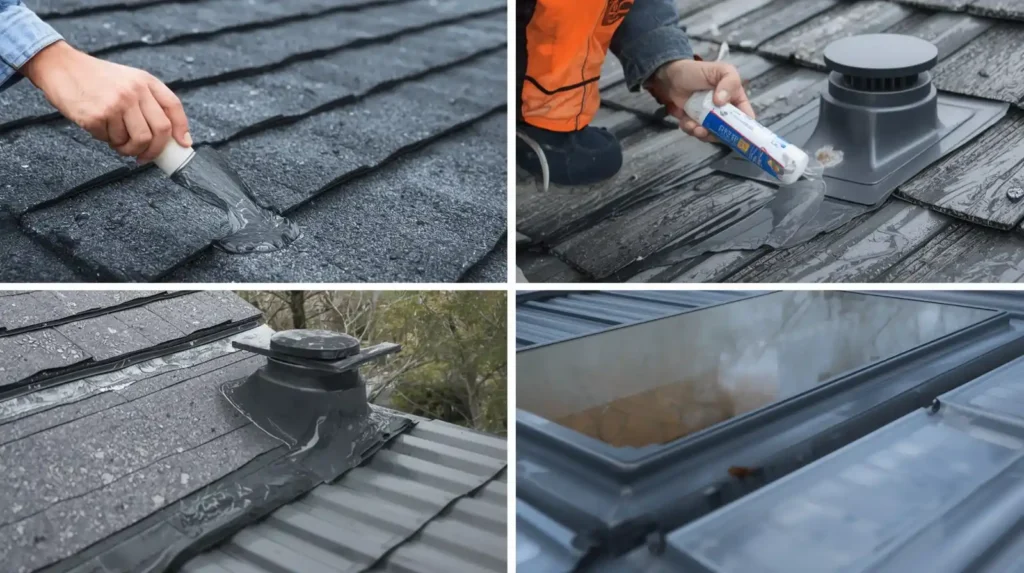
Once the leak is patched, the next step is sealing. How to seal a roof leak depends on the surface and size.
For wood or asphalt roofs, use liquid sealant or tar. For metal roofs, silicone sealant works best. Apply it around vent pipes, skylights, and roof valleys anywhere water tends to collect.
Keeping your roof sealed stops small leaks from returning. It also protects against future moisture damage that could lead to rotting or mold.
Repair Roof Leak from Inside Attic: Best Practices from Experts
When performing internal roof repair, it’s important to work smart, not just hard. Roofing experts recommend starting from the inside of the attic, since that’s where the leak usually begins. Begin by carefully inspecting the roof sheathing for any soft or rotted spots and reinforce them if needed. A single patch often isn’t enough, so it’s a good idea to seal the area twice to make sure it’s fully protected. Keeping the attic well-ventilated after completing the repair helps everything dry faster and prevents new moisture from collecting.
Professionals from FONZ Construction often find that many homeowners underestimate the impact of attic leaks. Water that enters through even a small crack can spread across beams, insulation, and ceiling materials before it ever becomes visible. Taking the time to fix leaks from the inside gives you quick control of the situation and prevents more serious structural damage until a permanent repair can be made from the outside.
When to Call a Professional for Home Roof Leak Repair in Hillsboro
There comes a point when even the most confident do-it-yourself homeowner should reach out for help. If you live in Hillsboro and your roof continues to leak after multiple attempts to fix it, the problem may be more serious than it appears. Persistent leaks often mean there’s a structural issue hidden beneath the surface. Signs that it’s time to call a professional include leaks that spread across different parts of the ceiling, soft or sagging roof decking, or a musty odor in the attic. If your ceiling starts to bulge or show new discoloration even after a patch, the damage is likely worsening underneath.
Professional roofers have the right equipment to detect leaks behind insulation and within the roof structure. They can repair them completely and replace damaged shingles, flashing, or underlayment to prevent future leaks. When the problem keeps returning despite temporary fixes, professional intervention is the smartest and safest option.
Preventing Future Roof Leaks and Maintaining a Strong Roof
The best solution to roof leaks is prevention. Making roof maintenance a regular part of your yearly routine helps you catch small issues before they turn into big problems. Conducting roof inspections twice a year, ideally during spring and fall, allows you to spot damage from storms or wear. Cleaning out your gutters ensures that rainwater flows freely instead of backing up under your shingles. Trimming overhanging branches helps keep debris from damaging your roof, while maintaining proper attic ventilation prevents moisture buildup from the inside. Finally, sealing vents and flashing with waterproof materials keeps vulnerable areas protected against leaks.
Consistent care extends your roof’s lifespan and saves you from unnecessary repair costs in the long run. When a leak does occur, acting quickly can prevent major damage. You now have the knowledge to handle small repairs and temporary fixes, but if the problem continues or spreads, it’s best to trust the professionals.
FONZ Construction provides expert roof inspections, repairs, and maintenance services to help keep your home strong, dry, and secure all year round.
If your roof has started leaking and you want a lasting solution, contact our experienced roofing team today for a free inspection. We’ll help you stop the leak for good and protect your home with professional care and attention.
Contact our roofing experts today for a free inspection and long-term solution that protects your home and peace of mind.